Regardless of whether the base is insulated, rendered or has visible brickwork, it is one of the parts of a building that is subject to the most loads. In addition to rising damp and splashwater, loads can also be mechanical. Especially if the base is damaged or waterproofing is missing, then serious damage can occur.
Base waterproofing with MB 2K
The base area of the existing building is exposed to particularly extreme loads. Whilst the façade section above generally shows no signs of damage even after many years, the paintwork on the base often starts to peel, shows signs of efflorescence or even massive spalling. The base area is the seam between the façade and the waterproofing of the building that has contact with the ground. Therefore, visible areas and also areas that have contact with the ground always needs to be examined and restored. Remmers MB 2K is an innovative waterproofing product that can be used to securely and permanently waterproof this transition area. Due to its innovative formulation, MB 2K demonstrates excellent adhesion to mineral and also bitumen-based surfaces.
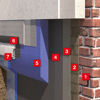
1 Priming
Prime the prepared, mineral surface with Kiesol (1:1 with water) up to at least 30 cm above the ground level.
2 Bonding course
Within the reaction time of the Kiesol, apply WP Sulfatex as a bonding course in a “wet-on -wet” method.
3 Equalisation
Equalise all unevenness with WP DS Levell in a wet-on-wet method.
4 Base seal
Apply waterproofing with MB 2K in at least two work steps.
5 Base insulation
Professional design of the base insulation with base render in the splashwater area.
6 Plaster sealing
Seal the pores in the base render with MB 2K. Apply the waterproofing min. 5 cm above the ground level.
7 DS Protect
Assembly of the DS Protect up to the ground level.

Waterproofing of floor depth windows & doors
Openings, connections or transitions need to be connected securely to the flat waterproofing of buildings. This is especially challenging for house doors and floor-to-ceiling windows. In addition to the difficulties in processing conventional waterproofing materials, there are often adhesion problems in the transition area of mineral surfaces on window and/or door elements. Complicated transitions can be waterproofed reliably with a combination of MB 2K and joint belt SK 10 / SK 25. This allows the newly installed window and door elements to be connected easily to the existing waterproofing of buildings, especially during restoration.
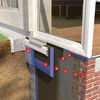
1 Priming
Apply Kiesol (1:1 with water) evenly on the cleaned, mineral subsurface. Pre-wet heavily absorbent subsurfaces with water.
2 Bonding course
Within the reaction time of the Kiesol, apply WP Sulfatex as an bonding course in a fresh-on-fresh method.
3 Equalisation
Equalise all unevenness with WP DS Levell in a wet-on-wet method.
4 Attach joint band
Adhere joint tape SK 10 to transition areas of mineral surfaces and window / door elements.
5 Bonding course/scratch coat
Apply MB 2K as a scratch coat in the transition between the joint band SK10 and the equalisation.
6 Base seal
Apply waterproofing with MB 2K in at least two work steps (2 mm dry layer thickness).
7 Base insulation
Completely adhere the base insulation boards with MB 2K. Rework the surface of the insulating boards with MB 2K to close all pores.
8 Waterproofing protection
Assembly of the DS Protect up to the ground level.

Base seal
4 products foundView:
Article No. 043025
Rigid mineral waterproofing grout with high resistance to sulphate


